Wednesday, May 30, 2012

Slow-Roasted Tomatoes

Slow-Roasted Tomatoes
One of my favorite things about warmer weather is all the fresh produce that comes with it. Since we move so often, I haven’t been able to have my own garden. Russell and I are moving once again in just a few short months and we plan to be in our new location for the long haul. We have already been planning our garden for next year, tomatoes, zucchini, cucumbers, peppers, the list goes on and on. In the meantime, we have been enjoying the fresh produce from the local farmer’s market. 

Slow-Roasted Tomatoes

I have never been a big fan of sun-dried tomatoes. Most of the ones that you buy in the store are dry and leave me wishing they were more flavorful. After I picked up two containers of grape tomatoes, I began to wonder what I was going to do with them other than the obvious answer of eating them on a salad; finally I settled on roasting them. I’m not sure that I would really call this a recipe but instead more of a technique. Once I took them out of the oven I couldn’t help but try one and oh my goodness, they are truly a million times better than anything you buy in the store, they are irresistible. I had to summon all my will power to keep from eating these by the handful. 

I understand turning on your oven in the middle of the summer is probably the last thing you’d like to do, but believe me it is so worth it. Turn it on after the sun goes down and let them roast while you are relaxing on the couch--I promise you won’t be sorry. 

Printer-Friendly Version

Ingredients:
  • Cherry, grape, or roma tomatoes
  • Garlic cloves, unpeeled
  • Olive oil
Directions:
Preheat oven to 250 degrees F. Line a baking sheet with aluminum foil or parchment paper.

Halve each tomato and place on prepared baking sheet. Place garlic on baking sheet as well and lightly drizzle tomatoes and garlic with olive oil. 

Bake for approximately 2 and 1/2 hours or until tomatoes look dry and shriveled but still have a little juice on the inside remaining.

After tomatoes and garlic have cooled, transfer to an airtight container and drizzle with more olive oil to prevent them from drying out (I stored mine in a mason jar). Enjoy!
Source: Smitten Kitchen

Wednesday, May 23, 2012

Apple Cinnamon Baked Cake Doughnuts

Apple Cinnamon Baked Cake Doughnuts

When my sister and I were younger, we would stay with my Nanny during the summer. My Nanny was raised in Alabama on a farm, and when I say she can cook--I mean she can really cook. I can still taste her perfectly cooked rutabagas, cabbage, and her cornbread; just to name a few of my favorites. She would take us to the farmer’s market and we would pick out fresh fruits and vegetables. We also always had a home cooked meal for lunch at her house. 

Breakfast was a different story. A lot of times my sister and I would get to my Nanny’s house before she was even awake. You can call my Nanny at 10:00p.m. and she is probably still up, but don’t call her before 8:30 or 9:00a.m because she is probably still snoozing! For breakfast we would have cinnamon sugar toast, peanut butter toast or instant oatmeal. My favorite instant oatmeal was apple cinnamon and my sister always loved the peaches and cream. I guess you could say my love for all things apple cinnamon started early because I still love the flavor combination. 

Apple Cinnamon Baked Cake doughnuts 3

This apple bread is one of my favorites, but I don’t always want to wait 45 minutes to have a slice. These baked donuts are the perfect solution! I have made these no less than 3 times in the last week. They are that good. Make them and you won’t be disappointed.

Printer-Friendly Version

Ingredients:
  • 3/4 cup flour
  • 1/3 cup sugar
  • 2 Tablespoons cornstarch
  • 1 teaspoon ground cinnamon
  • 1 teaspoon baking powder
  • 1/2 teaspoon salt
  • 1/2 cup buttermilk
  • 1 egg
  • 1/2 teaspoon vanilla extract
  • 1 apple, peeled and finely diced or shredded*
*I have made this both ways and prefer the texture the finely diced apple gives the doughnuts.

Directions:
Preheat oven to 425 degrees F. Lightly grease a 6-well doughnut pan.

In a small bowl, sift together flour, sugar, cornstarch, cinnamon, baking powder, and salt.


In another small bowl combine buttermilk, egg, and vanilla extract. Pour wet ingredients over the dry ingredients and stir until just combined. Using a spatula, fold diced or shredded apple into batter.


Evenly distribute the batter in the doughnut pan. Bake for 7-8 minutes. Let cool in pan for 1-2 minutes and then remove to a wire rack to cool the rest of the way.


Top with powdered sugar, cinnamon sugar or drizzle with icing.


Adapted from: Baked Cake Doughnuts with Chocolate Glaze

Thursday, May 17, 2012

Lemon Curd

Lemon Curd

When I was a kid I loved to peel a lemon and eat it sprinkled with just a little bit of salt. My parents told me all the time this was bad for my teeth...while I wish I had listened to them, at the time I didn’t care as it was quite a delicious snack. Oddly enough my appreciation for lemon desserts didn’t begin until I was a little older--now I love lemon desserts. I have been wanting to make lemon curd for some time, but all the recipes I found called for several egg yolks. So I continued to search for a great recipe and finally found one that used 3 whole eggs. I reduced the amount of sugar and decided to omit the lemon zest so the texture would be smooth.

Lemon Curd

Russell and I enjoyed fresh blackberries drizzled with this lemon curd and also spread some on top of some blueberry muffins. There are many possible uses for lemon curd: filling for a cake, topping on a scone or biscuit, mixed into yogurt--the possibilities are endless! However you enjoy yours you will find yourself going back for more lemony-goodness by the spoonful and enjoying every last bit of it!

Printer-Friendly Version

Ingredients:
  • 3 eggs
  • 2 lemons, juiced (and zested if you’d like)
  • 1 cup sugar
  • 1 Tablespoon butter, cut into a few cubes
Directions:
Fill a small pot with a few inches of water and bring to a simmer. In a medium sized heat-proof bowl, such as a pyrex bowl, whisk together the eggs, lemon juice, and sugar. Set heat-proof over the simmering water, ensuring the bottom of the bowl is not touching the water. Continuously whisk mixture until it becomes thick, about 15-20 minutes. 

Remove from heat and whisk in butter. Stir in lemon zest, if desired. Allow to cool, then pour in a clean container. Store in the refrigerator. Keeps for about a week (it might last longer but we had eaten ours by then).

Slightly adapted from: Call me Cupcake

Sunday, May 06, 2012

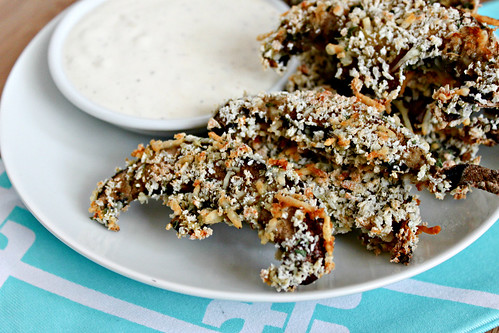
Baked Portobello Fries with Lemon-Garlic "Aioli"

Apple Cinnamon Baked Cake Doughnuts

When I was around 10 years old, we were quickly running out of room in our current house so my parents began house hunting. They found a lovely house that was up for sale due to the previous owner’s pending divorce. Since this couple was in quite the hurry to get everything settled, they had the house listed at a great price. My parents could not pass up such a great deal and we ended up moving in a couple months later. Other than the great deal that they got on this house, there was another contributing factor that helped solidify my parent’s decision. My grandmother (my dad’s mom) lived next door. I know, you are probably thinking of Everybody Love’s Raymond but really, it was different-- it was great!

Since my grandmother was right next door, we often shared dinners together or my mom would have my dad take her a plate. Unfortunately my Nanny has an intolerance to garlic which has resulted in my mom omitting it in just about everything she makes. It wasn’t until I went away to college that I discovered my love of garlic. Now I can’t imagine cooking without it.


Mushroom 1

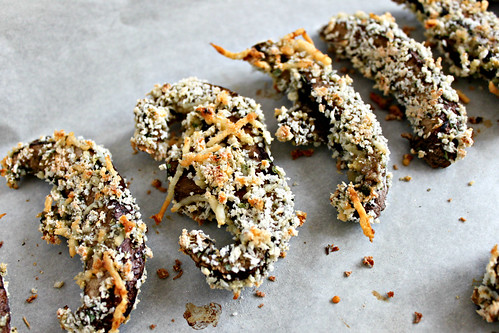
These baked portobello fries are better than anything you can order at a restaurant. Besides the fact that these are baked and not fried, the panko coating gives them a nice crunchy, airy texture and the mushrooms themselves are nice and juicy. While the mushrooms are great, the lemon-garlic aioli is what really makes these portobello fries amazing. The roasted garlic flavor added to the citrusy lemon makes for a wonderful combination. Dip your portobello fries in this aioli and you will find yourself unable to stop!

Printer-Friendly Version

Ingredients: 
  • 2-3 portobello mushrooms, "gills" removed, and sliced 1/4-1/2 inch thick*
  • 1/2 cup panko bread crumbs
  • 2 Tablespoons flour
  • 1/2 teaspoon dried oregano
  • 1/2 teaspoon dried parsley
  • 2 Tablespoons freshly grated parmesan
  • 1/4 teaspoon salt
  • 1/4 teaspoon pepper
  • 1 egg
*I saved myself a little bit of time and bought pre-sliced portobello mushrooms since they were on sale at the grocery store. If using whole portobellos, you want to make sure you slice them 1/4-1/2 thick. 

Lemon-Garlic "Aioli"
  • 1/4 cup mayonnaise
  • juice of 1/2 lemon
  • 2 garlic cloves, roasted and crushed (or finely minced)
  • salt and pepper to taste
Directions:

Preheat oven to 425 degrees F. Line a baking pan, such as a cookie sheet, with parchment paper or a silicone baking mat.

In small bowl, beat the egg.

On a plate, combine the panko, flour, oregano, parsley, parmesan cheese, salt and pepper.

One by one, dip the mushroom slices in the egg and then thoroughly coat each one with the panko mixture. Place the mushrooms slices on the prepared baking pan in a single layer and bake 10-15 minutes, turning the slices over half-way through to ensure even browning. 

Lemon-Garlic "Aioli": In a small bowl, combine the mayonnaise, lemon juice, and garlic. Season with salt and pepper to taste. Refrigerate 30 minutes prior to eating, to allow flavors to blend. 

Adapted from: A Cozy Kitchen and Kitchen Goddess
Back to Top